
If you are an Enhanced Electronic Payments customer, the status of your vendors’ enrollment can be viewed in the Vendor Enrollment Inquiry window. Filters can be applied that include or exclude vendors of a particular status. You can also view according to Vendor ID, Vendor Name, Check Name or Enrollment Date:
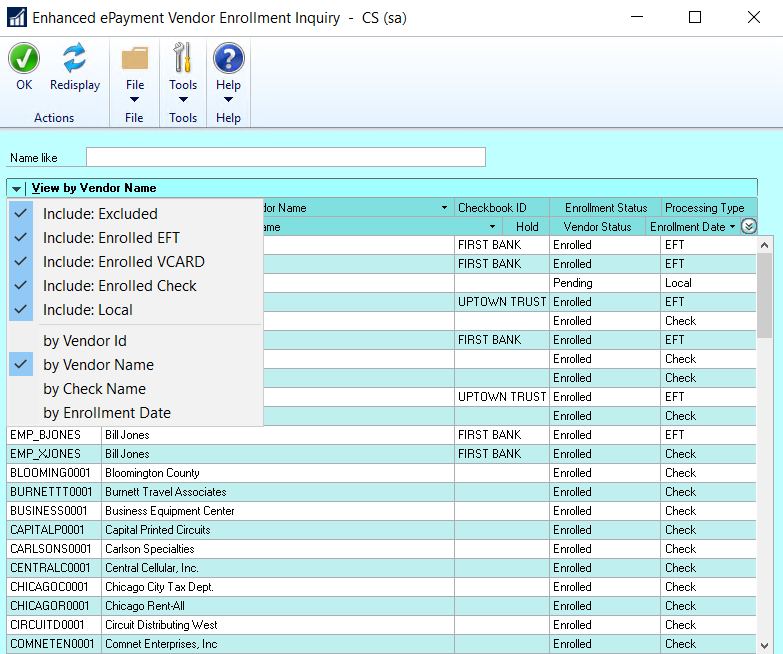
Enrollment Status
There are three possible Enrollment Status for your GP vendors:
- Pending: This vendor’s information will be sent to the ePayment system either overnight, or next time the Send Vendor Master button is clicked. Until that time payments to this vendor are processed locally using GP or MICR functionality.
- Excluded: This vendor’s information is not sent to the ePayment service, and payments to this vendor are processed locally.
- Enrolled: This vendor’s information is sent to the ePayment system, and their payments are processed by whatever payment type is listed in the processing type column.
Processing Type
There are four possible processing types for your GP vendors:
- Check: The ePayment service processes payments to this vendor by printing and mailing checks.
- EFT: The ePayment service processes payments to this vendor as EFT payments.
- VCARD: The ePayment service processes payments to this vendor by issuing virtual credit cards via email.
- Local: Payments to this vendor are processed locally. However, if enrolled, this vendor’s information is sent to the ePayment service. The service will work on your behalf to convert the vendor to accept virtual credit cards.
How to Change Vendor Status
A vendor’s status can also be viewed and even changed within the Vendor Maintenance window. Depending on the current status, you can apply one of the following changes to the vendor status:
- From Enrolled Check/ EFT/ Vcard to Excluded or Local Processing.
- From Excluded to Enrolled or Local Processing.
- From Local Payment Processing to Enrolled or Excluded.
Please note that while the transition to Excluded or Local Processing is immediate, the transition to Enrolled is only effective after the most up-to-date vendor information has been sent to the ePayment system, and a status update has been received by Dynamics GP. Until the updates have been transmitted, the Vendor’s status will be listed as Pending Enrollment.
- Select a Vendor ID using the look-up.
- Click on Additional > Enhanced ePayment Status to open the Enhanced ePayment Status window. In this example, Allenson is currently enrolled as a vendor that accepts checks printed off-site.

- Use the drop-down menu in the Enhanced ePayment Status window to change to the desired status. In this case, the vendor can be switched to Excluded or Local Processing.
![]()

Vendor Status Change Shortcut
Please note, this same task can be accomplished with a shortcut:
- Right-click anywhere within the Vendor Maintenance window, once your Vendor ID has been selected.
- The vendor’s current status will be displayed. Click on the arrow to the right of the status to display other options.

- Choose the desired status.
Any changes in Vendor Status get updated every day so that the Vendor Master file in Dynamics GP and in the ePayment system are in sync.
Need more help with this?
We value your input. Let us know which features you want to see in our products.